A properly functioning toilet flapper is crucial for maintaining an efficient and leak-free toilet. When this small but essential component fails to seal correctly, it can lead to water waste, increased utility bills, and potential damage to your bathroom.
Understanding the Importance of a Properly Sealing Toilet Flapper
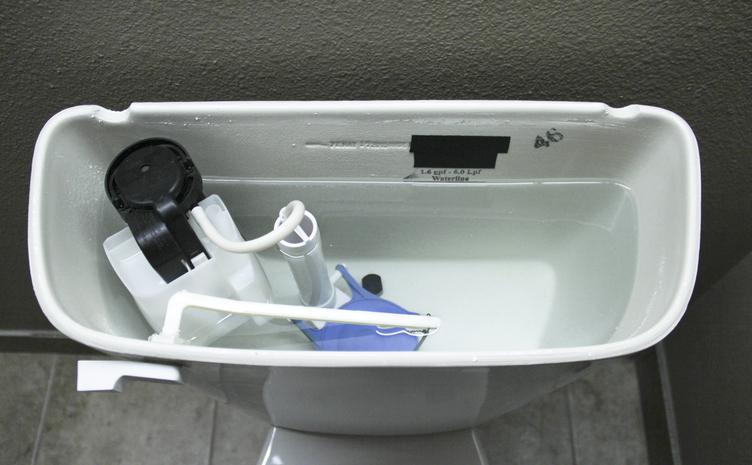
The toilet flapper is a rubber seal that controls the flow of water from the tank into the bowl when you flush. When functioning correctly, it creates a watertight seal that prevents water from continuously flowing into the bowl. However, when the flapper fails to seal properly, it can result in:
- Constant running water
- Incomplete flushes
- Increased water bills
- Potential water damage to your bathroom floor
Recognizing the signs of a faulty flapper early can save you from these inconveniences and expenses. Let's delve into the reasons why your toilet flapper might not be sealing properly and how to address each issue.
5 Common Reasons Your Flapper Isn’t Sealing
- Worn Out or Warped Flapper: Over time, the rubber material of the flapper can deteriorate, become brittle, or warp. This wear and tear can prevent the flapper from creating a proper seal, allowing water to leak continuously into the bowl.
- Mineral Build-Up: In areas with hard water, mineral deposits can accumulate on the flapper and the flush valve seat. This build-up can interfere with the flapper's ability to create a tight seal, leading to leaks.
- Flapper Chain Issues: The flapper chain connecting the flush lever to the flapper can sometimes be too short, too long, or tangled. This can prevent the flapper from closing properly or cause it to close too quickly, resulting in incomplete flushes.
- Flush Valve Problems: The flush valve seat, where the flapper rests, can become damaged or develop irregularities. This can create gaps that prevent the flapper from sealing correctly.
- Flapper Not Installed Properly: If the flapper is not correctly aligned or installed, it may not sit flush against the valve seat, leading to leaks and inefficient flushing.
Step-by-Step: How to Fix a Toilet Flapper
How to Replace a Worn-Out Flapper
- Turn off the water supply to the toilet and flush to empty the tank.
- Unhook the chain from the flush lever.
- Remove the old flapper by detaching it from the overflow tube or pegs on the flush valve.
- Clean the flush valve seat thoroughly.
- Install the new flapper, making sure it's properly aligned and securely attached.
- Reattach the chain, leaving a small amount of slack.
- Turn the water supply back on and test the flush.
How to Clean Mineral Build-Up
- Turn off the water supply and flush the toilet to empty the tank.
- Remove the flapper and soak it in a mixture of equal parts white vinegar and water for 30 minutes.
- Use a soft brush to gently scrub away any remaining deposits.
- Clean the flush valve seat with the vinegar solution and a brush.
- Rinse all components thoroughly and reinstall the flapper.
- Turn the water supply back on and test the flush.
How to Adjust or Replace the Flapper Chain
- Observe the chain's tension when the flush lever is at rest.
- Adjust the chain length so there's a slight slack when the lever is not in use.
- If the chain is damaged or corroded, replace it with a new one.
- Ensure the chain doesn't get tangled or caught on other components.
How to Repair or Replace the Flush Valve
- Inspect the flush valve seat for cracks, chips, or irregularities.
- If minor damage is present, try using a fine-grit sandpaper to smooth out the surface.
- For significant damage, replacing the entire flush valve may be necessary. This is a more complex repair that might require professional assistance.
How to Guarantee Proper Flapper Installation
- Check that the flapper is correctly aligned with the flush valve seat.
- Ensure the flapper's ears or pegs are securely attached to the overflow tube or flush valve.
- Verify that the flapper moves freely and sits flat against the valve seat when closed.
Preventive Tips for Maintaining Your Toilet Flapper
To keep your toilet flapper functioning properly and prevent future issues, consider these maintenance tips:
- Conduct regular visual inspections of the flapper and other tank components.
- Clean the flapper and flush valve seat periodically to prevent mineral build-up.
- Avoid using harsh chemical cleaners in the tank, as they can damage the flapper.
- Replace the flapper every 4-5 years, even if it appears to be functioning correctly.
- Address any leaks or running toilets promptly to prevent further damage.
By following these preventive measures, you can extend the life of your toilet flapper and maintain optimal toilet performance.
Professional Toilet Flapper Repair & More
While many flapper issues can be resolved with DIY solutions, some situations may require professional assistance. Consider contacting a licensed plumber if:
- You're uncomfortable performing the repairs yourself
- The problem persists after attempting the solutions outlined above
- You notice significant damage to the flush valve or other toilet components
- There are signs of water damage or mold growth around the toilet
At Benjamin Franklin Plumbing, our experienced technicians are equipped to handle all types of toilet repairs, including complex flapper and flush valve issues. We pride ourselves on providing prompt, reliable service to ensure your plumbing systems are functioning efficiently. Call us at 1-877-BEN-1776 or contact us online.


 Your Privacy Choices